How to Manage Broadcast Audiences (Add or Remove Recipients)
Why Manage Broadcast Audiences?
Here's when you'll need to adjust your broadcast recipients:
Adding Recipients
Common scenarios:
- ? Forgot a class - "Oops, I meant to include Kindergarten 2 as well!"
- ? New enrollment - Student joined after you created the broadcast
- ? Expanding reach - Decided more parents should see this information
- ? Follow-up needed - Additional classes now affected by the announcement
Removing Recipients
Common scenarios:
- ❌ Wrong target - "Wait, this was only for Preschool, not Primary!"
- ? Student withdrew - Child left the centre, parent shouldn't receive updates
- ? Correcting mistakes - Selected the wrong class in the dropdown
- ? Too broad - Realized the broadcast doesn't apply to everyone
How to Add Target Audiences
Need to include more recipients? Here's how to expand your broadcast reach.
Step 1: Open Your Broadcast
- Navigate to Communication > Broadcasts
- Find your broadcast (works for Draft, Scheduled, or Published broadcasts)
- Click to open the broadcast details
Step 2: Access Broadcast Actions
Click the Broadcast Actions button at the top right of the page. The dropdown menu will appear with several options.

Step 3: Select "Add Target Audience"
From the dropdown menu, click Add Target Audience.
This opens the audience selection wizard—the same interface you used when creating the broadcast.
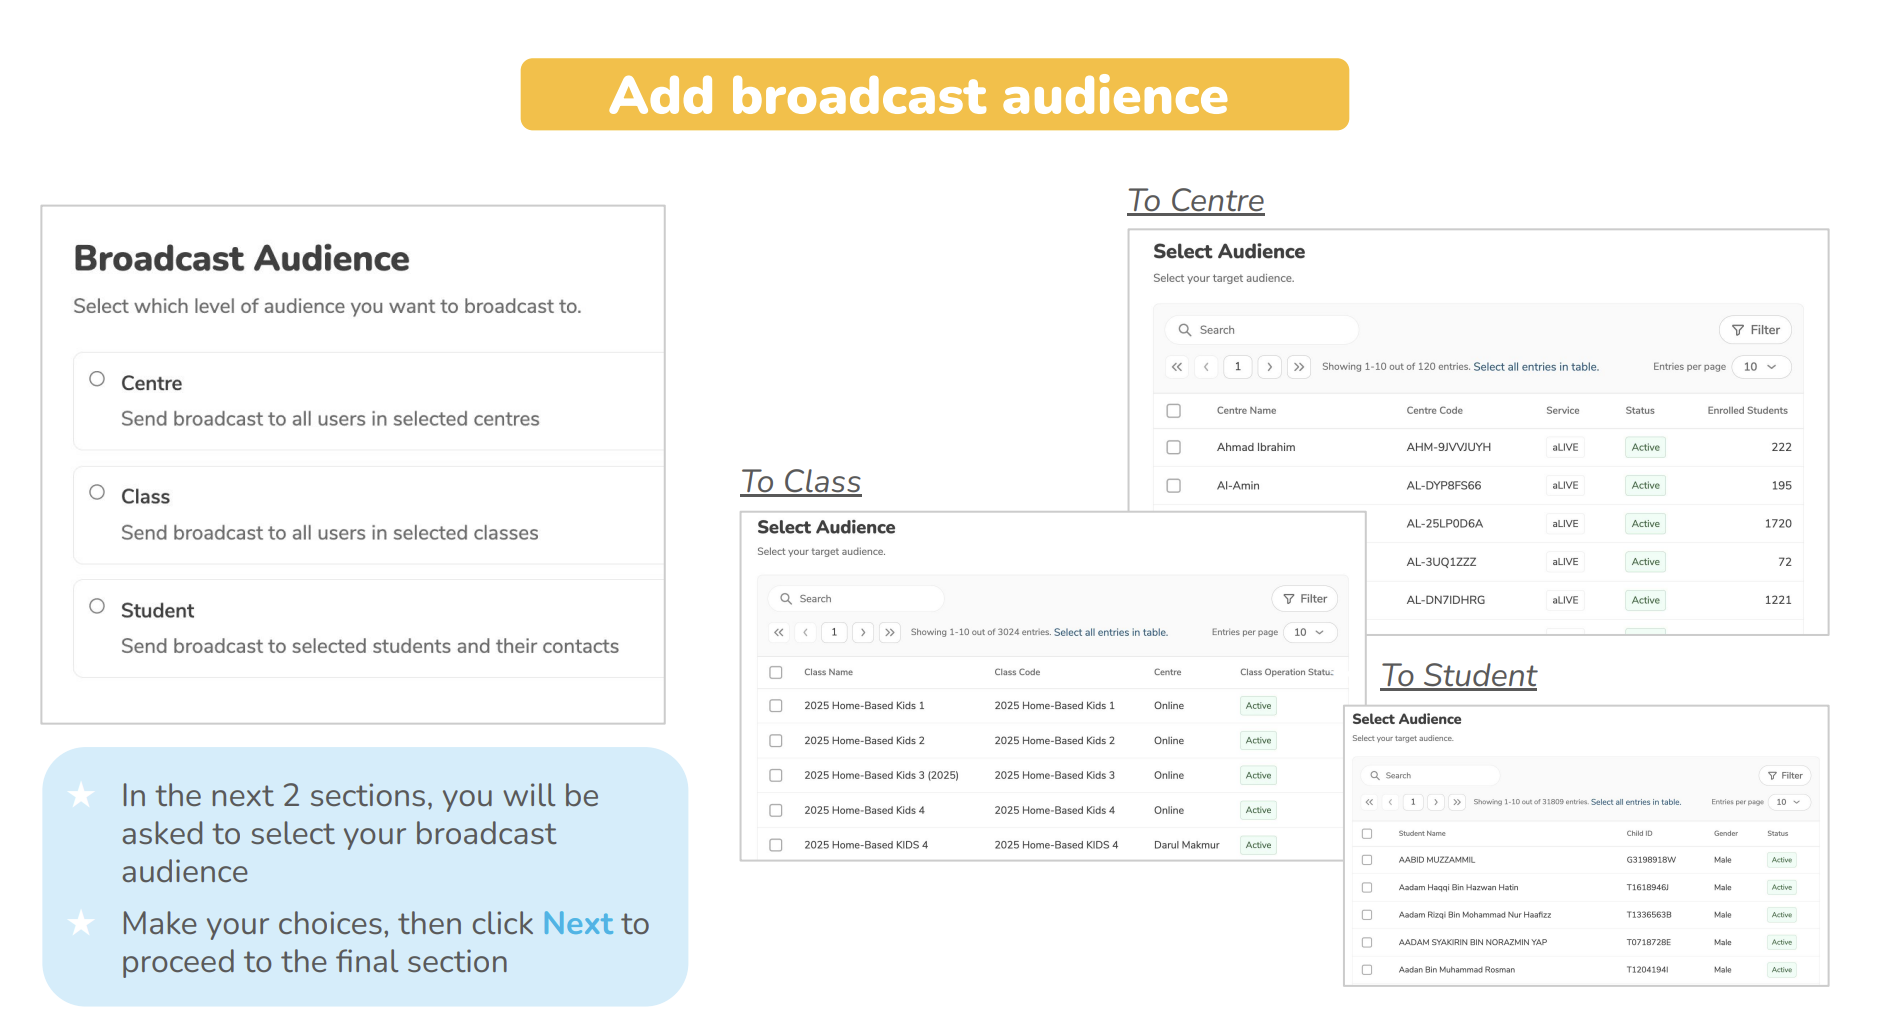
Step 4: Choose Your Audience Type
You'll see three options:
Option 1: To Centre
- Select this to add ALL parents in your centre
- Good for upgrading a class-specific broadcast to school-wide
Option 2: To Class
- Select this to add specific classes
- You'll see a list of all classes to choose from
Option 3: To Student
- Select this to add individual students
- You'll see a searchable list of all students
Step 5: Make Your Selections
Depending on what you chose:
If you selected "To Class":
- You'll see a list of all classes in your centre
- Check the boxes next to classes you want to add
- You can select multiple classes at once
- Click Next when done
If you selected "To Student":
- You'll see a searchable list of students
- Use the search bar to find specific students
- Check the boxes next to students you want to add
- You can select multiple students at once
- Click Next when done
If you selected "To Centre":
- No additional selections needed—it includes everyone!
- Click Next to proceed
Step 6: Review and Confirm
After making your selections, you'll see a review screen showing:
- Who was already receiving the broadcast
- Who you're about to add (highlighted as NEW)
- Total number of recipients
Double-check everything looks correct!
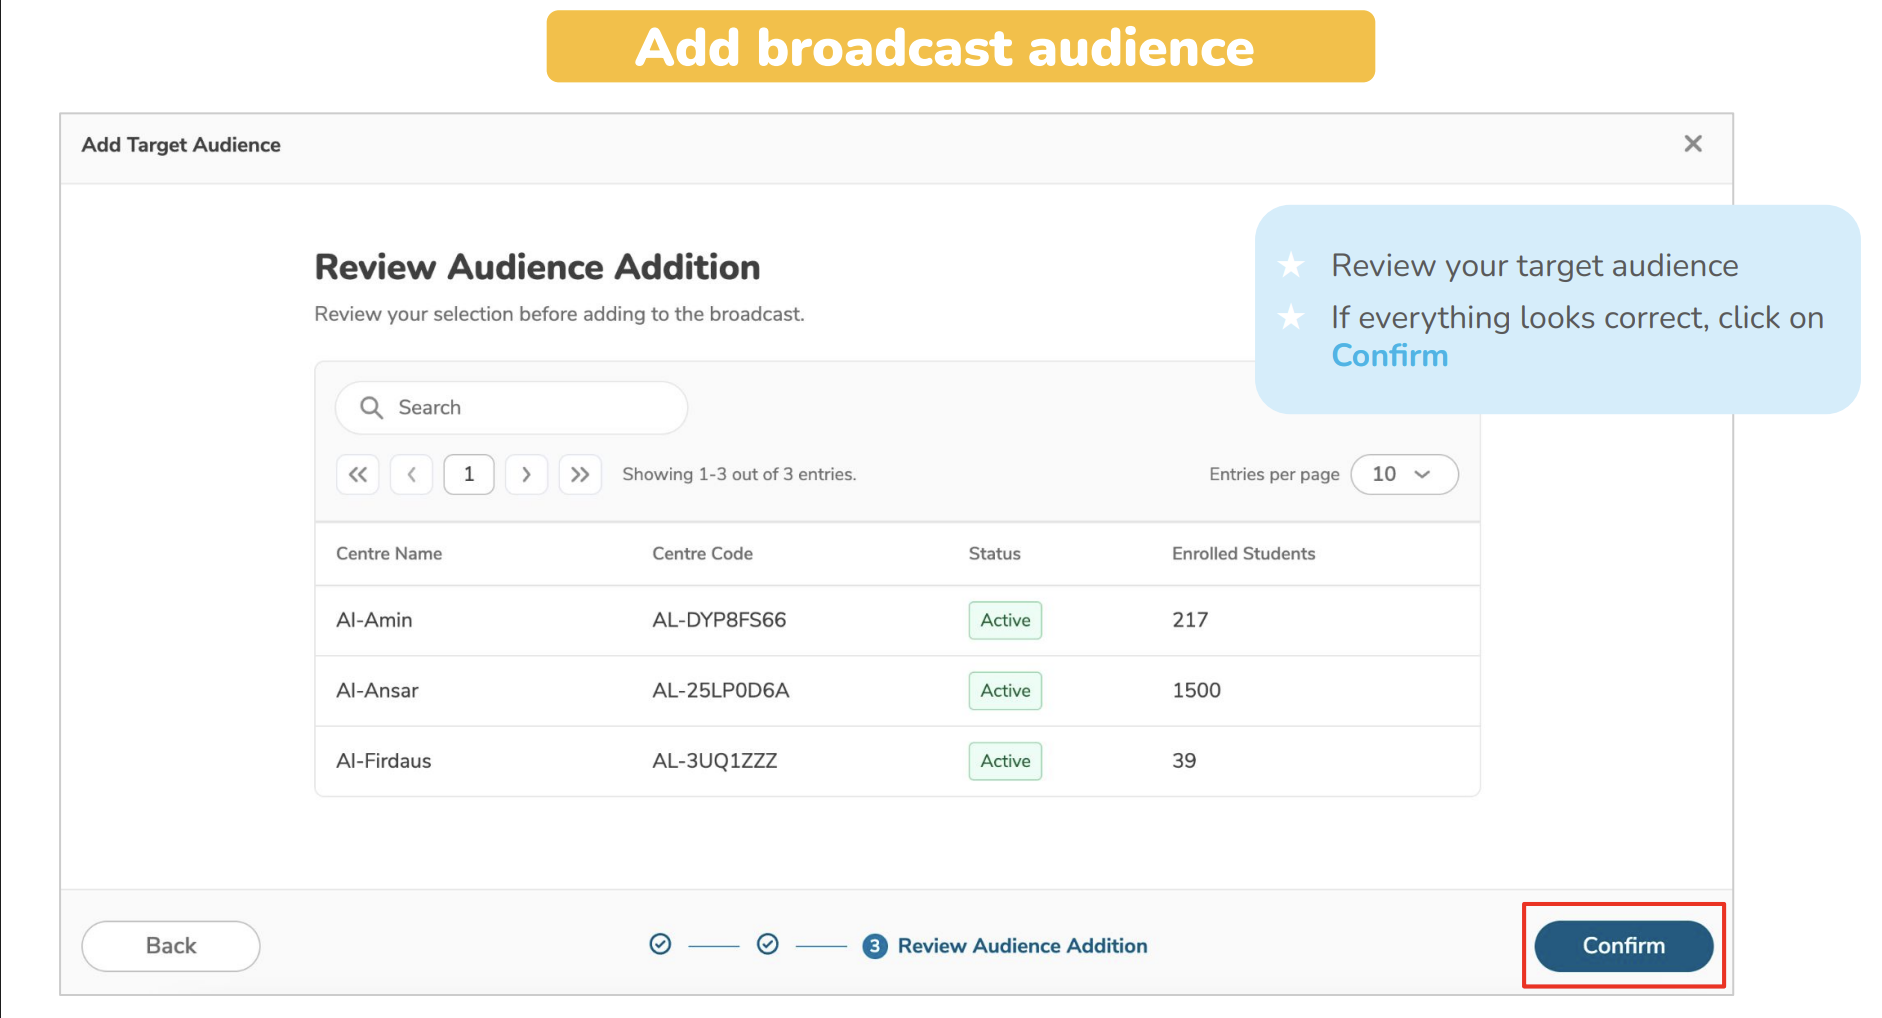
Step 7: Confirm Addition
Click Confirm to add the new audiences.
Step 8: Addition Complete!
The new recipients are now added to your broadcast. What happens next depends on your broadcast status:
If broadcast is DRAFT:
- New audiences added to the list
- No notifications sent yet (it's still a draft)
- Will receive notification when you publish
If broadcast is SCHEDULED:
- New audiences added to the list
- No notifications sent yet
- Will receive notification at the scheduled time (along with original recipients)
If broadcast is PUBLISHED:
- New audiences added immediately
- ? Push notifications sent to new recipients RIGHT NOW
- They see the broadcast in their app immediately
- Original recipients are unaffected (no duplicate notifications)
⚠️ Published Broadcast Warning: Adding audiences to an already-published broadcast means those new parents get the notification immediately, even if you published it days ago. They'll see the original sent date/time, which might be confusing. Consider including a note in the broadcast if timing matters.
How to Remove Target Audiences
Made a mistake? Need to remove recipients? Here's how to take audiences off your broadcast list.
Step 1: Open Your Broadcast
- Navigate to Communication > Broadcasts
- Find and open the broadcast you need to modify
- Go to the Target Audience tab
This tab shows all recipients currently set to receive (or who already received) the broadcast.
Step 2: Select Audiences to Remove
Look through the list and identify who shouldn't be receiving the broadcast:
- Tick the checkbox next to each audience you want to remove
- You can select multiple audiences at once
- Be careful to select only the ones you want to remove!
? Pro tip: You can sort or filter the list to find specific audiences more easily.
Step 3: Click "Bulk Action"
At the top of the audience list, you'll see a Bulk Action button (it usually appears once you've selected at least one checkbox). Click it to see available actions.
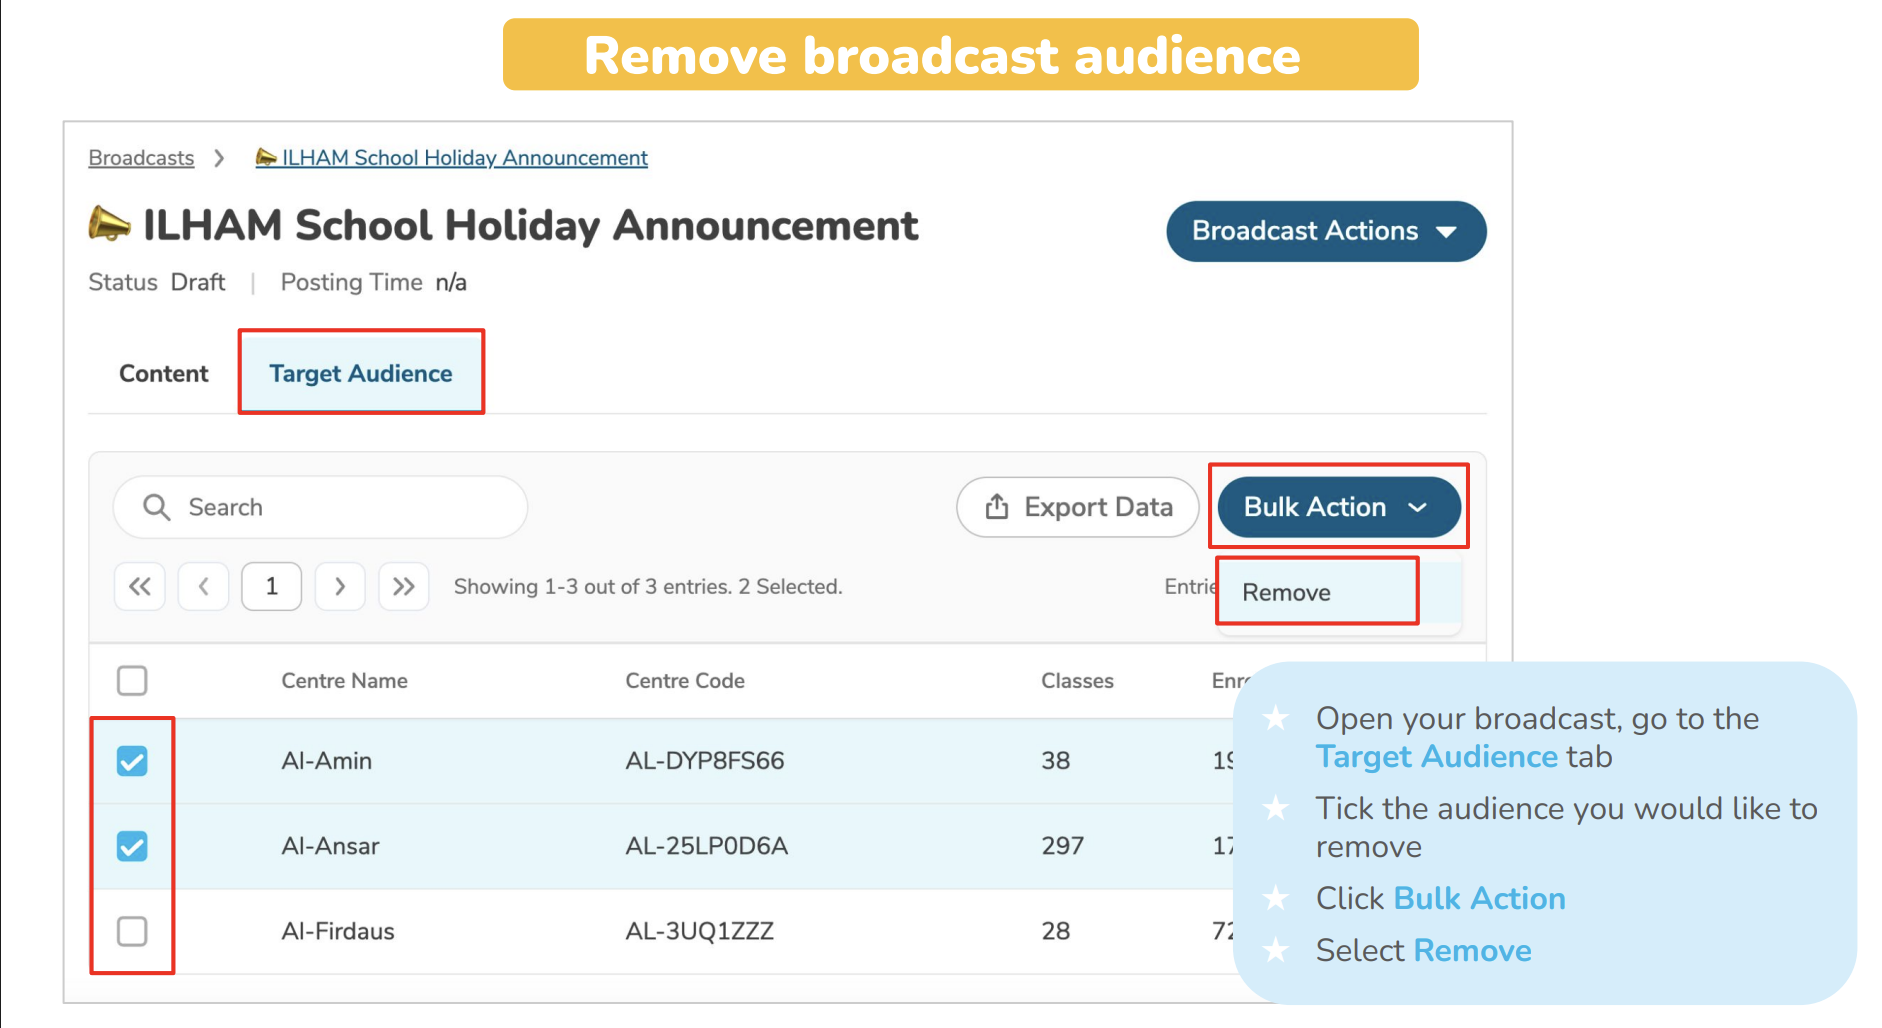
Step 4: Select "Remove"
From the Bulk Action dropdown menu, click Remove.
A confirmation dialog will appear—this is your chance to double-check you're removing the right people!
Step 5: Confirm Removal
The confirmation dialog shows:
- How many audiences you're removing
- Which specific classes/students will be removed
- Warning about the action
Review carefully, then click Confirm (or Remove) to proceed.
Step 6: Removal Complete!
The selected audiences are now removed from your broadcast recipient list.
What happens next:
If broadcast is DRAFT or SCHEDULED:
- Removed audiences simply won't receive the broadcast when it publishes
- Clean and simple—no notifications involved
If broadcast is PUBLISHED:
- ⚠️ Important limitation: You CANNOT "unsend" a broadcast
- Removed audiences already received and can still see the notification
- They can still access the broadcast in their app history
- Removing them prevents them from seeing FUTURE edits clearly
- The broadcast won't appear in their "current" listing, but they've already seen it
? Reality check: If you published to the wrong audience, removing them afterward doesn't erase their memory. They already got the notification. Your best bet is to:
- Remove them from the audience list
- Archive the broadcast (removes it from their current view)
- Send a correction broadcast if necessary
- Consider sending an apology to the wrong recipients
Advanced Audience Management Tips
Mixing Audience Types
You can absolutely combine different audience types in one broadcast:
Example 1: Centre-Wide + Specific Students
- Select "To Centre" for the main message
- Add specific students who need extra attention
Example 2: Multiple Classes + Individual Students
- Select "To Class" and choose Class A and Class B
- Add 3 specific students from Class C who also need this info
Example 3: Building Comprehensive Reach
- Start with specific classes
- Add individual students whose siblings are in other classes
- Result: Targeted but comprehensive distribution
Bulk Management Strategies
For large changes:
- Export your current audience list (if available)
- Plan your additions/removals in a spreadsheet
- Process them in batches
- Verify after each batch
For regular broadcasts:
- Create templates with common audience combinations
- Document which classes typically need which types of announcements
- Build a standard distribution list for recurring communications
Common Scenarios & Solutions
Scenario 1: "I Forgot to Include a Whole Class!"
If broadcast is still DRAFT or SCHEDULED:
- Add the missing class using "Add Target Audience"
- They'll receive the notification when it publishes
- No issues—easy fix!
If broadcast is already PUBLISHED:
- Add the missing class
- They'll receive notification immediately
- Be ready to explain why they're getting it late
- Consider adding a note: "Update: This also applies to [Class Name]"
Scenario 2: "I Sent It to the Wrong Class by Mistake!"
If broadcast is still DRAFT or SCHEDULED:
- Remove the wrong class from Target Audience tab
- They'll never receive it—problem solved!
If broadcast is already PUBLISHED:
- Remove the wrong class (won't fully erase their view)
- Archive the broadcast (removes from their current view)
- Send a brief apology broadcast to that class
- Create a new broadcast for the correct audience
Scenario 3: "A Student Withdrew, But They're Still Getting Broadcasts"
Solution:
- Go through your SCHEDULED broadcasts
- Remove the withdrawn student from each one
- For PUBLISHED broadcasts, removing them is optional (they already received it)
- Better long-term: Update the student's status in Student Management so they're automatically excluded
? Prevention: Keep your Student Management module updated. Withdrawn students should be marked as such to prevent future broadcast inclusion.
Scenario 4: "I Need to Add Multiple Individual Students from Different Classes"
Efficient approach:
- Use "Add Target Audience" > "To Student"
- Use the search function to find each student
- Check all of them in one go
- Confirm once—all added together
Much faster than adding them one by one!
Scenario 5: "Can I Add Parents Who Aren't Linked to Students?"
Short answer: No.
Broadcasts only go to parents linked to active students in your system. If someone needs to receive broadcasts but isn't linked to a student:
- They need to be added as a contact in Student Management
- Set them as a Primary Contact for a student
- Then they'll appear in the student selection list
Need More Help?
If you're having trouble managing broadcast audiences or need help with a complex audience situation, contact the LittleLives support team at mmwss.support@littlelives.com
Include:
- The broadcast name/ID
- What you're trying to accomplish
- Any error messages you're seeing